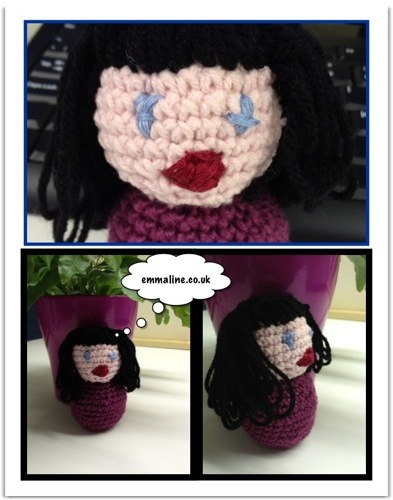
I made this amigurumi caricature doll for a colleagues birthday earlier this year, and it received great comments (especially the pouty lips!). So I thought I’d share the crochet pattern here on the craft blog.
The crochet terms used throughout this pattern are UK, if you want to convert into US crochet terms, please see my crochet abbreviations and conversion guide. This project is worked in rounds.
Hook: 3.5mm
Yarn: I used Kool Kotton DK in KK01 for the head, James Brett Top Value in plum 8423 for the body, and in black 8430 for the hair.
Skill level: medium/advanced beginner.
Notions: yarn needle, stitch marker, cross-stitch threads, toy stuffing, tapestry needle (or plastic craft needle).
dec = decrease
inc = increase
dc = double crochet (UK terms)
Head
Work in rounds.
R1: 6dc into magic ring, sl st.
R2: ch1, dc in same, 2dc in next 5 dc, sl st.
R3: ch1, dc in same, 2dc in next dc, 2dc in next dc, dc in next 3 dc, 2dc in next dc, 2dc in next dc, 2dc in next dc, dc in next 3 dc, sl st.
R4: ch1, dc in same, dc in next 3 dc, 2dc in next dc, dc in next 4 dc, 2dc in next dc, dc in next 4 dc, sl st.
R5: ch1, dc in same, dc in next 3 dc, 2dc in next dc, dc in next 6 dc, 2dc in next dc, dc in next 3 dc, 2dc in next dc, dc in next 6 dc, sl st.
R6-8: ch1, dc around, sl st.
R9: ch1, dc in next dc, dec, dc in next 6 dc, dec, dc in next 3 dc, dec, dc in next 6 dc, dc in next dc, sl st.
R10: ch1, dec, dc in next 4 dc, dec, dc in next 3 dc, dec, dc in next 4 dc, dec, dc in next 2 dc, sl st.
R11: dc in next 4 dc, dec, dec, dec, dc in next 3 dc, dec, dec, sl st. Stuff head with toy filling.
R12: dec around, fasten off. Stuff with more toy filling if required, then stitch closed.
Put amigurumi head to one side, and make the body.
Body
Work in rounds.
R1: 6dc into magic ring, sl st.
R2: inc around.
R3: * inc, inc, dc in next dc * repeat around.
R4: * inc, dc in next dc * repeat around.
R5-8: dc all around.
R9: dc in next 13 dc, dec, dc in next 13 dc, dec.
R10: * dc in next 5 dc, dec * repeat around.
R11: * dc in next 4 dc, dec* repeat around.
R12: dc in next 8 dc, dec, repeat around.
R13: dc around, sl st. Fasten off and stuff with toy stuffing.
Making Up
- Sew the head to the body using a tapestry needle or plastic craft needle.
- Use yarn for the hair, you could make fringing and then sew, but I chose to sew the hair straight from te ball of yarn. Basically, I left a long loop of yarn after each stitch into the head and made a tight stitch after to secure. To ensure there were no gaps in the hair, you can just make stitches in the gaps.
- Stitch the facial details using cross-stitch threads.
That’s it! Enjoy your new amigurumi doll, or give as a gift.
I’d love you to share your creations with me, leave a comment below with details!